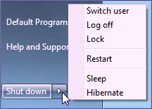
If you moving away from computer for a small period of time, it is advisable to put PC to sleep mode rather than leaving to ON and running. This saves power and allows you to quickly resume work as soon as you return. You can easily put Windows 7 PC to sleep or hibernation in few simple clicks.
Put Windows 7 PC to sleep or hibernate
 1. Click Start button and then click arrow button next to it.
2. Select Sleep or Hibernate option as per requirement.
Sleep or hibernate option is missing
There could be situation, where sleep or hibernate option is missing from your Windows PC. This could be due to number of reasons like system administrator controls, video card with no sleep support or outdated drivers. Also, sleep could be disabled in BIOS – restart PC, press F2 or key indicated at manufacturer logo screen before Windows splash screen and then enter BIOS to enable sleep option.
You can also prevent computer from ever going into sleep or hibernation automatically using Don’t Sleep utility. Also, you can schedule time at which PC should hibernate automatically. If you do not use Hibernation feature, you can delete hiberfil.sys file and save lot of hard drive space.
