‘Push to talk’ has been most requested feature by Skype for Windows users. Latest Skype update adds ‘Push to talk’ feature allowing quick toggle for microphone muting while on a Skype call. This feature is very important during multi-tasking routines like while playing multi-player games. Here is quick procedure to setup keyboard shortcut key to ‘mute microphone’ courtesy new ‘Push to talk’ feature for Skype users on Windows PC.
Enable ‘Mute Microphone’ hotkey on Skype for Windows
First, make sure you are using latest version of Skype for Windows. To update Skype software, open Skype and then goto Help > Check for Updates option. Once you download and install latest update, following is easy routine to set hotkey for toggling mute on microphone during Skype call.
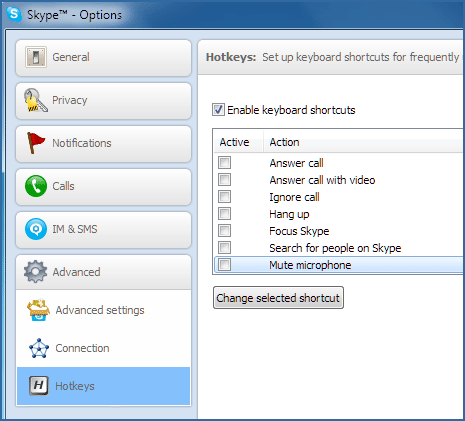
1. Goto Tools > Option – this will open Skype options box. Here click on Advanced section at bottom left side and then click on Hotkeys option.

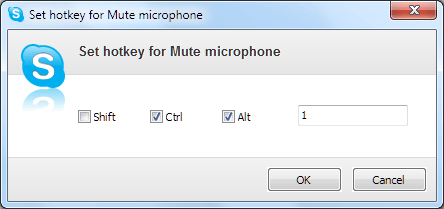
2. Click to check ‘enable keyboard shortcuts’ option. Now click to highlight ‘Mute Microphone’ option at the bottom and then click ‘change selected shortcut’ button.

A new pop-up box will open from where you can set hotkey to mute microphone. Select either combination of: shift, Ctrl, Alt key and additional key as hotkeys to mute microphone.
3. Click OK to close the pop-up box and then click Save button on Skype options box. This will enable new keyboard shortcut to mute microphone using keyboard shortcut.
For Mac users of Skype: ‘Push to talk’ feature is already available to them. Press CMD + SHIFT + M to mute any conversation. If you are on mute and want to talk, hold CTRL + OPTION + CMD + UpArrow on keyboard. This works even if you have minimised Skype and are using the call control bar.
