 Do you have to share files between two Windows 7 operating system computers at your home or office? This is can be easily done by establishing a LAN connection between two computers and share files, folders, data without need of the internet. For such connection, you will need a crossover cable and of course two Windows 7 PCs that should be connected.
I. Enable Sharing on Windows 7 PC
First, you need to enable Sharing and Discovery of both the PCs with Windows 7 operating system.
1. Goto Control Panel > Network and Sharing Center.
2. Under the section ‘Sharing and Discovery , enable the option Network discovery, File Sharing, Public folder sharing and others if needed.
II. Name Computer & create Workgroup
1. Goto Start and right click on “Computer”. Click Properties .
2. In the System properties window click “Change settings” link at middle right.
3. At “Computer description” Give each computer a description (should not be same).
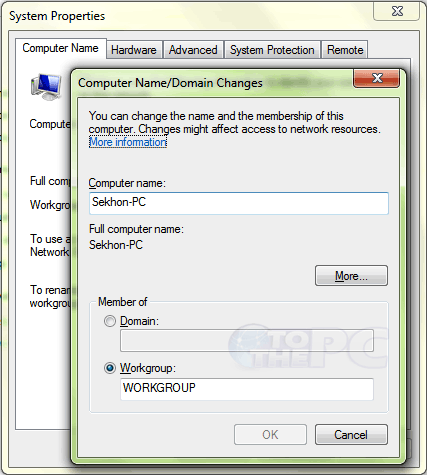
4. Click on “change” to change name of the computer and create a workgroup.

5. In the name option give it the same name you gave it for its description and in the workgroup section type in “New network” (Note: Names of the computers should NOT be the same, but Workgroup name should be exactly the same on both PCs)
6. Once you change these, you will be asked to restart the computer, so simply click OK at the prompt to restart.
III. Assign IP address to PCs
1. Open control panel, Goto Network And Internet >Network And Sharing Center
2. Open HomeGroup & click Advance Sharing Setting.In Home to work select: Turn on Network Discovery > Turn on file and printer sharing > Turn on public folder sharing > Enable file sharing for device > Allow windows to manage
3. In Public select >Turn on Network Discovery >Turn on file and printer sharing >Turn on public folder sharing >Enable file sharing for device >Turn off password protected sharing
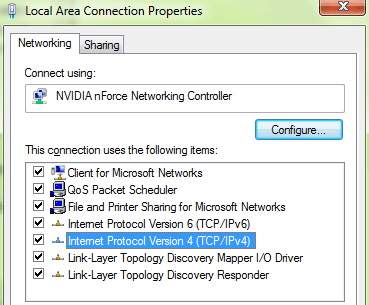
4. After computers are rebooted we have to setup IP addresses to each PC. When Network and Sharing Center is opened, open Local Area Connection properties.

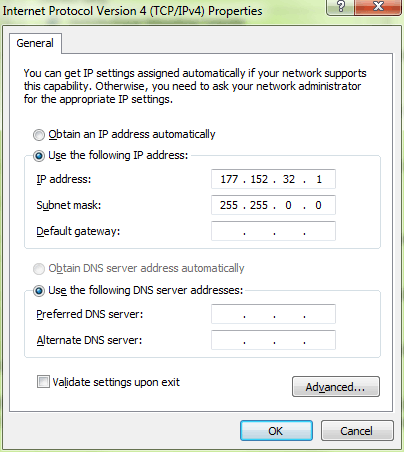
5. Scroll down to “Internet Protocol Version 4(TCP/IPv4)”, click it and click properties button. Then click on “Use the following IP address” and at “IP Address” type in an IP address e.g 177.152.32.1.

6. Now both PCs must have different IP addresses, (make the second PC’s IP address 177.152.32.2). After you set the IP addresses just press the tab button (and get a number in the subnet mask as 255.255.255.0), press OK.
Connect both PCs using cross over cable and plug to each computer’s network card RJ45 port. Now will be able to see the computers listed in “Network and Sharing Center“. You are all set to share files!
